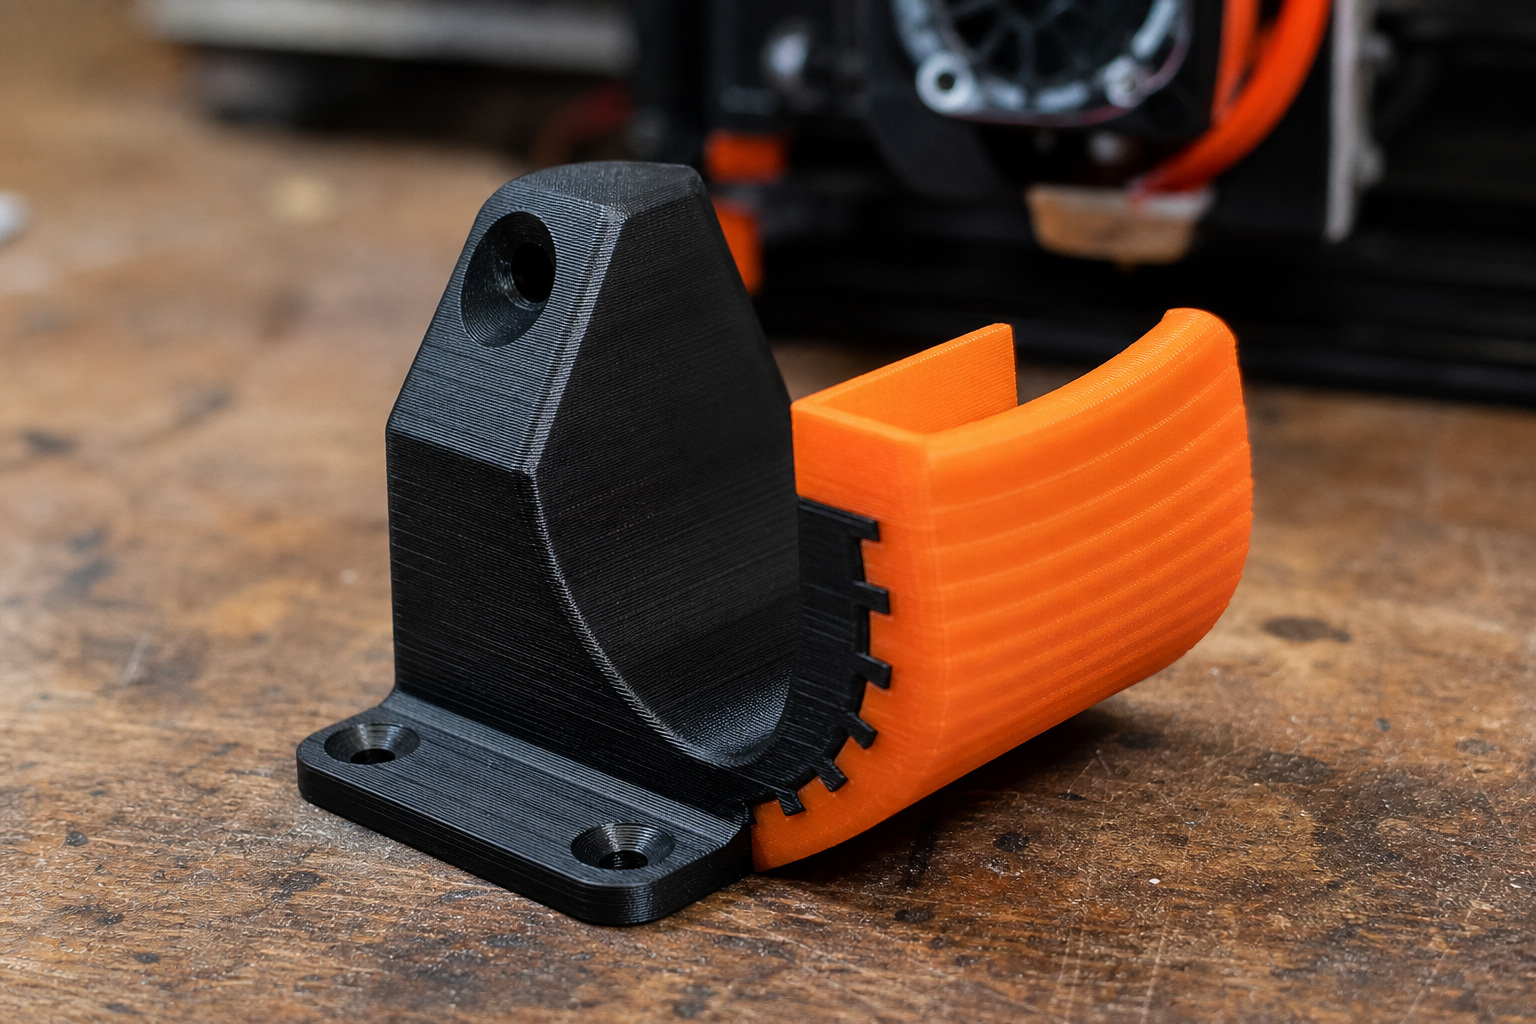
Printing TPU and PLA together works, and it's a common way to build rigid parts with soft grips, bumpers, or seals. The catch is that most guides aim you at the wrong problem. Managing "two different extrusion temperatures" barely matters here: PLA and TPU ranges overlap around 215–225 °C, so one shared nozzle temperature prints both. Two things actually decide whether your part survives: feed the TPU from a direct-drive extruder, and design the joint so the two plastics physically lock together instead of relying on a flat, glued-looking face. Get those right and the temperature question mostly answers itself.
That reframing changes where you spend your effort. Below: the physics of why these materials refuse to bond, the hardware that qualifies, the exact settings to start from, and the joint geometry that turns a weak seam into a part you can throw across the room.
What TPU and PLA Actually Are
PLA (Polylactic Acid) is a rigid, brittle bioplastic that prints easily at low temperatures and holds tight tolerances. TPU (Thermoplastic Polyurethane) is a flexible elastomer, usually around Shore 95A hardness for a general-purpose roll, that stretches and absorbs shock but feeds poorly through long tubes. You combine them to get stiffness and flex in one object: a hard shell wrapped in a soft edge.
Material Profiles and Printing Parameters
Before you tune a single slicer value, it helps to know what personality each spool brings to the print bed, because those personalities dictate every setting downstream.
PLA is the cooperative half of the pair. It lays down predictably, resists warping, and grips a bed with little fuss, which is why it makes the structural skeleton in almost every two-material part. That same rigidity is its limit: it has no give, so it's the material you shape into the frame, the threads, and the load-bearing walls, never the part that has to bend.
TPU is the reason the project exists and the reason it's finicky. You reach for it precisely because it flexes, cushions, and springs back where PLA would snap. Everything that makes it useful in the finished object, its softness and elasticity, is exactly what makes it awkward in the feed path, so the whole print job bends around keeping it happy. Treat TPU as the constraint and PLA as the flexible partner in the slicer, not the other way around.
One habit saves more failed prints than any single number: pull the printed spec sheet for each specific spool and slice to those figures rather than to a generic profile. Filament formulas differ from brand to brand, and even two rolls both sold as "PLA" or "TPU 95A" can want different heat and flow. Where two spools' recommended windows overlap is where your shared settings belong, so read both labels before you build a profile and use the numbers in the sections below as a starting point to confirm, not a fixed rule.
Why the Two Plastics Won't Bond
PLA and TPU form a mechanical bond, never a chemical one, and that single fact drives every design decision that follows. When you melt PLA onto TPU, the two polymers don't fuse the way two PLA layers do: they cool as separate materials touching at a face. The bond you get is friction and surface texture, and it's meaningfully weaker than a same-material layer line.
Thermal shrinkage makes the seam worse. As the part cools, PLA contracts roughly 0.2–0.5%, while TPU shrinks about 0.5–1.5% depending on its Shore hardness. The two materials pull away from each other at the interface, loading a joint that was already weak. A plain flat boundary between them will peel apart under minimal stress. This is why a mechanical interlock isn't a nice-to-have: it's the whole strategy.
Hardware That Qualifies
Before anything else, check whether your printer can feed TPU at all. The feed path length is the deciding factor, not the brand.
- Dual direct-drive or IDEX (Independent Dual Extruder): The most reliable setup. Two separate hotends print both materials in one job with no temperature swapping and no oozing from the idle nozzle if offsets are calibrated. Examples include BCN3D, Sovol, and Snapmaker IDEX machines.
- Single direct-drive extruder: Works, but only for a manual filament swap at a horizontal boundary. The motor sits directly above the nozzle, so the short feed path stops flexible TPU from buckling.
- Bowden setups: Not suitable for TPU. The long PTFE tube lets soft filament compress and coil inside instead of advancing, causing jams.
- Single-nozzle multi-material units (MMU, AMS, ERCF-style swappers): Discouraged. These push filament through long tubes and swap one nozzle between materials: exactly the two conditions TPU fails under. Flexible filament jams in the feed path, and TPU oozing contaminates the PLA sections during changeovers.
If you own a single-extruder Bowden printer, you can still make these parts: you just print the PLA and TPU pieces separately and assemble them, covered further down.
Ways to Combine PLA and TPU
Five routes exist, and the right one depends on your hardware and how much stress the joint carries.
| Method | How it works | Best for | Main drawback |
|---|---|---|---|
| IDEX (dual direct-drive) | Two independent hotends print both materials simultaneously | Complex two-material geometry in one job | Needs an IDEX printer; nozzle offsets must be exact |
| Dual/tool-changer direct-drive | Two toolheads swap in, each dedicated to one material | Reliable simultaneous printing | Cost; TPU toolhead needs a tight feed path |
| Single-nozzle MMU swap | One nozzle loads, purges, and swaps materials | PLA-only multicolor (not this job) | TPU jams and oozes; avoid for TPU |
| Manual filament swap | Pause at a layer, change filament, resume | Clean horizontal rigid-then-flexible splits | One boundary only; no interlocking mid-print |
| Print separately, then glue | Two prints, bonded after the fact | Joints under real load | Requires the right adhesive and surface prep |
The manual swap is the cheapest and works on any direct-drive printer. Its limitation is geometry: you get one flat transition line, so pair it with an interlocking design in your CAD model, not a plain flat split.
Settings to Start From
Run both materials at the TPU's tolerances, because TPU is the fussier plastic. A single shared nozzle temperature and bed temperature print both, and the print speed drops to whatever TPU can handle cleanly. Sources vary by a few degrees; find where your two specific filament brands' ranges overlap and start there.
| Setting | PLA | TPU (Shore 95A) | Shared strategy |
|---|---|---|---|
| Nozzle temp | 190–220 °C | 210–245 °C | 215–225 °C: the overlap where PLA won't degrade and TPU flows |
| Bed temp | 50–60 °C | 30–60 °C | 50–60 °C, good on PEI or glass |
| Print speed | 40–100 mm/s | 15–30 mm/s | Run everything at 15–30 mm/s; faster grinds TPU |
| Retraction | Normal profile | 0–1 mm (direct only) | Minimal for TPU; per-extruder if your slicer allows |
| Cooling fan | 100% | 30–50% | ~50%; low or off at the interface layers |
| Layer height | 0.2 mm | 0.2 mm | Match both exactly |
Two settings matter more than the rest. Keep TPU retraction near zero: pulling flexible filament back buckles it inside the extruder and causes clogs. And keep the fan low at the bonding interface: PLA likes aggressive cooling, but chilling the seam kills what little adhesion TPU offers. UltiMaker's TPU guidance points to roughly 20–30 mm/s to avoid under-extrusion and stringing, which lines up with the shared speed above.
Designing the Joint So It Holds
The joint is where success or failure is decided, and every strong joint does the same thing: it captures TPU inside PLA so the flexible material can't pull free. Pick features that create physical overlap, not a flat shared face.
- Through-holes and pegs: Holes in the PLA that TPU flows through and flares on the far side, acting like rivets: the strongest common option.
- Dovetails: A wedge-shaped groove in PLA that TPU compresses into and can't slide out of.
- Undercuts: A lip in the PLA that flexible TPU stretches over and snaps behind.
- Alternating teeth or interlocking fingers: Perimeters that overlap so load transfers through geometry.
- Perforated flanges: A PLA flange embedded in a TPU body, with TPU keying through the holes.
- Captured rings or grooves: A TPU seal held inside a PLA channel.
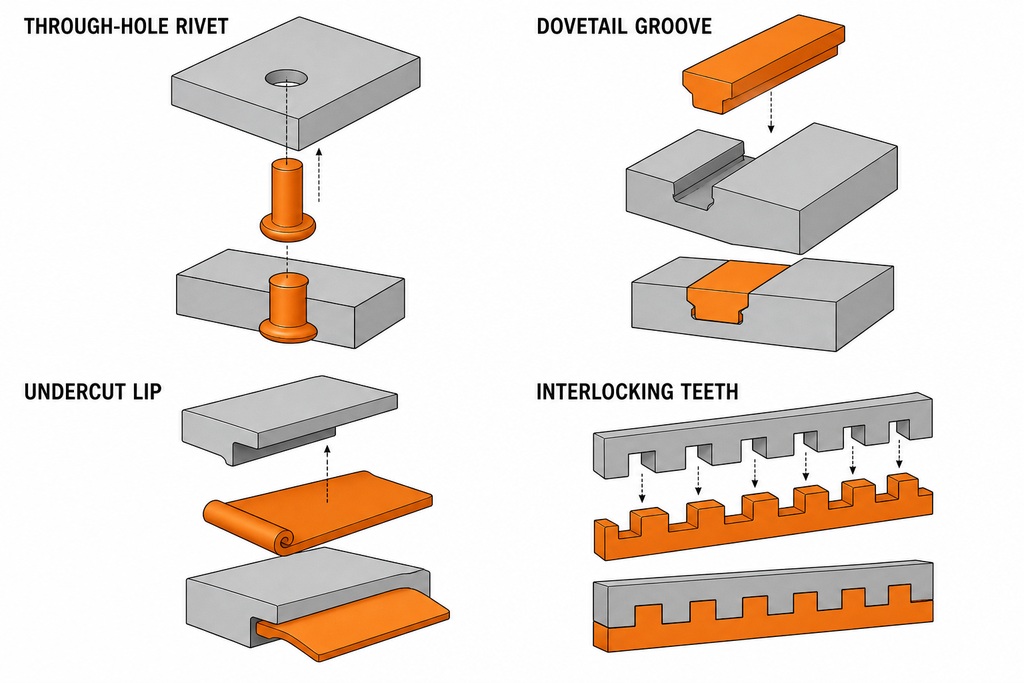
Size these features at least 2–3 extrusion widths across so they print cleanly and carry load. Round the corners wherever the TPU flexes repeatedly: sharp interior corners concentrate stress and start tears. Leave a 0.2–0.4 mm gap on interlocking features rather than a zero-tolerance fit. TPU shrinks more than PLA as it cools, so a tight interference fit either won't assemble or cracks the PLA as the TPU contracts around it. Cura can generate interlocking structures automatically for material pairs that don't bond on their own, which saves modeling the teeth by hand.
Slicer Setup, Step by Step
Set up a dual-extrusion slice so each material resumes cleanly and TPU stringing stays off the PLA.
- Assign each body or component to the correct extruder: PLA to one, TPU to the other.
- Match layer heights between the two materials exactly, or the interface won't line up.
- Set temperature, speed, retraction, and cooling per extruder, keeping TPU retraction short.
- Add a prime/purge tower so each nozzle stabilizes pressure before it resumes printing.
- Enable an ooze shield around the part if TPU strings onto the PLA.
- Keep the interface fan low or off to let the seam hold thermal contact longer.
- Prevent the idle nozzle from sitting hot enough to ooze continuously between switches.
- Calibrate nozzle offsets carefully: misalignment weakens the interface directly.
Drying the TPU First
Dry your TPU before it goes anywhere near the printer, or the print bubbles, strings, and bonds even worse than usual. TPU is strongly hygroscopic: it pulls moisture from the air, and that water flashes to steam at the nozzle, tearing the extrusion and roughening the surface the PLA has to grip. The standard treatment is 50 °C for 4–8 hours in a filament dryer or oven.
Can you dry PLA and TPU at the same time? Both plastics tolerate around 50 °C, which is a safe drying temperature for each, so a shared 50 °C run is reasonable in principle. That said, the drying guidance here is specific to TPU; PLA rarely needs drying unless it's visibly wet, and no source here explicitly confirms running the two together. If you do, keep the temperature at 50 °C: higher risks softening the PLA.
Using One Material as Support for the Other
Don't count on PLA and TPU to support each other cleanly: the results are unpredictable and geometry-dependent. PLA supporting TPU tends to weld into the flexible features and resists removal, especially around thin walls. TPU supporting PLA bends under the weight it's meant to hold and oozes, leaving a poor underside. The interface adhesion is the wild card: the same material pairing can peel apart too easily in one geometry and bond stubbornly in another.
Run a small interface test print before committing to a long job. For dependable PLA supports, PVA (water-soluble) or a dedicated breakaway material behaves far more predictably: UltiMaker lists both as established PLA support options.
When to Print Separately and Glue Instead
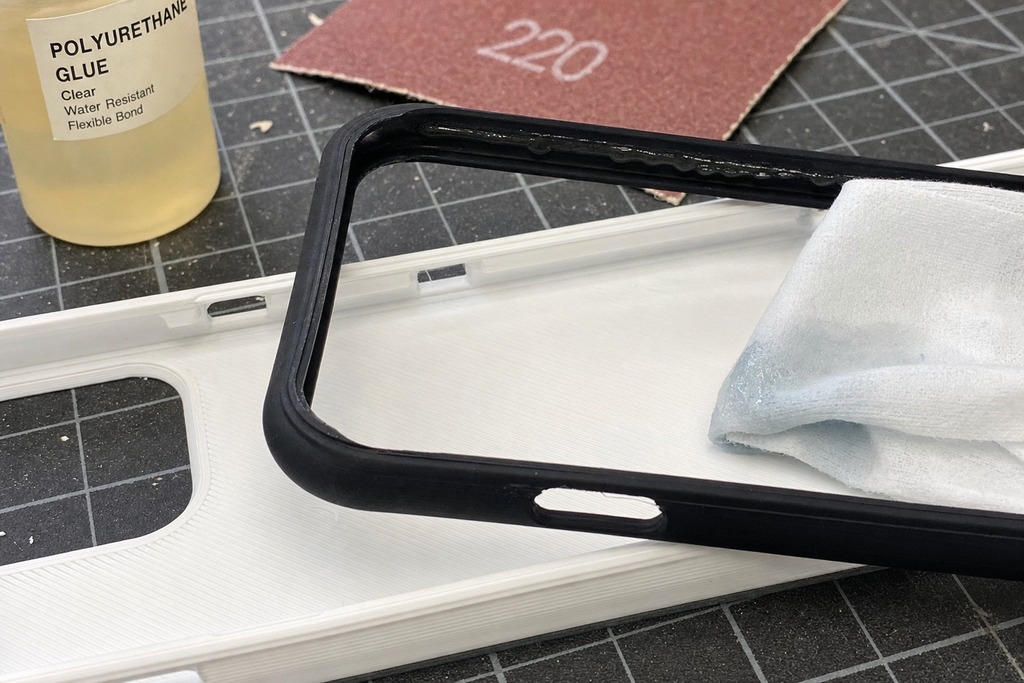
If the joint has to survive real peeling, tension, heat, or repeated flexing with no mechanical interlock, print the two parts separately and bond them: this is often the better part, not the fallback. The trick is choosing an adhesive that grips TPU's oily, flexible surface, where ordinary superglue and epoxy fail.
- Polyurethane adhesive (such as Gorilla Glue original) bonds well to both PLA and TPU.
- Flexible, rubber-toughened cyanoacrylate (such as Loctite's vinyl/fabric/flexible formula) survives the TPU flexing that would crack standard CA.
- Prep the surfaces: sand the PLA face with 220-grit to give the glue tooth, and wipe the TPU with isopropyl alcohol to strip mold-release oils before bonding.
Common Applications
The pairing shows up anywhere a part needs to be stiff in one place and give in another:
- Soft TPU grips on rigid PLA tool handles
- Phone and device cases: rigid shell with a flexible bumper
- Vibration dampers and printer/enclosure feet
- Gaskets and sealing rings built into structural PLA housings
- Living hinges connecting rigid PLA members
- RC and robotics wheels: PLA hubs with TPU tires
- Robotic grippers with soft contact pads
- Shoe soles: rigid midsole plus flexible outsole
Troubleshooting
| Problem | Fix |
|---|---|
| Delamination at the interface | Add mechanical interlocks; lower the interface fan; slow the first few interface layers; raise interface flow slightly |
| TPU stringing | Dry the filament; keep temperature at the low end that still flows; use a wipe/ooze shield |
| TPU jamming | Confirm direct drive; cut retraction to near zero; check extruder tension isn't crushing the filament |
| Inconsistent layers | Match layer heights exactly; slow TPU to a steady 15–30 mm/s |
| Elephant's foot on TPU | Lower bed temperature; nudge Z-offset up slightly |
Who Should Not Try This as One Print
Skip single-part multi-material printing if any of these describe you. If you own only a Bowden or single-nozzle MMU printer, TPU will jam more often than it prints — swap to printing separately and gluing. If your joint must carry sustained tension, survive heat, or flex thousands of cycles at the seam, the mechanical-only PLA–TPU bond will eventually fail no matter how clever the geometry, so bond separate prints with polyurethane glue instead. And if you're tempted to use PLA and TPU as each other's support material to save a second spool, don't — run a test coupon first, because removal is a coin flip. The technique rewards a direct-drive printer and a designed interlock; without both, you're fighting the materials.
FAQ
Can I print PLA and TPU at the same time?
Yes, on a dual direct-drive or IDEX printer that runs both materials simultaneously from separate hotends. On a single-extruder direct-drive machine, you can't print them truly at once, but you can pause at a layer, swap filament, and resume. Bowden and single-nozzle MMU printers can't feed TPU reliably, so print those parts separately and glue.
Can you support TPU with PLA?
You can, but it's unreliable. PLA supports often bond too tightly to TPU and tear the flexible features during removal, and the adhesion varies with geometry. Run a small interface test before a long print, and for dependable PLA supports use PVA or breakaway material instead.
Can I dry PLA and TPU together?
Both plastics tolerate about 50 °C, so a shared 50 °C drying run is reasonable, and TPU specifically needs 4–8 hours at that temperature because it absorbs moisture readily. PLA rarely needs drying unless it's visibly damp. Keep the temperature at 50 °C if you dry them together — going higher risks softening the PLA.
What is the holy grail of 3D printing?
The phrase gets used for goals like fully automatic multi-material printing, dissolvable-support reliability, or metal-strength parts from a desktop machine. For flexible-plus-rigid work specifically, the practical grail is a joint between dissimilar plastics that's as strong as the parent material — which, for PLA and TPU, is exactly why mechanical interlocking exists.
References
- UltiMaker — Printing with TPU: best practices for flexible success. https://ultimaker.com/learn/printing-with-tpu-best-practices-for-flexible-success/
- UltiMaker — How we test 3D printing material combinations. https://ultimaker.com/learn/how-we-test-3d-printing-material-combinations/
- UltiMaker — Dual-material printing guide: mastering dual extrusion. https://ultimaker.com/learn/dual-material-printing-guide-mastering-3d-printing-dual-extrusion/
- UltiMaker — Support materials: a beginner's guide. https://ultimaker.com/learn/support-materials-a-beginners-guide/